How to Adjust and Service Your Bike Headset
How-To
Your headset is the silent workhorse of your bike. It holds the fork in the frame, lets the bars steer smoothly, and absorbs every braking force, pothole hit, and out-of-the-saddle effort you throw at it. When it's set up correctly, you forget it exists. When it's loose, you get a sickening clunk every time you brake. When it's too tight, the bars resist turning and the bike feels twitchy and nervous in corners. And when the bearings are dry or rusted, you get the dreaded headset creak that follows you up every climb. The good news: 90% of headset complaints can be fixed in a parking lot with a single Allen wrench, and a full bearing service takes less than an hour with basic tools. This guide covers both - from a quick parking-lot adjustment to a full strip-and-regrease - for any modern threadless headset.
Quick Answer
To fix a loose headset: loosen the stem pinch bolts, tighten the top cap bolt until rocking play disappears (plus about 1/8 turn), center the bars, then re-torque the stem bolts to 5-6 Nm. Confirm fit first with our Reach & Stack Calculator. If a creak or grinding feeling remains, the bearings need cleaning and fresh grease - covered in Step 7.
Who This Guide Is For
This is an intermediate wrenching task. If you can adjust a saddle and use a torque wrench, you can adjust a headset. It's ideal for riders who:
- Hear a clunk from the front of the bike when braking
- Notice steering that feels notchy, stiff, or has a "dead spot" pointing straight ahead
- Hear a persistent creak under hard pedaling that's not coming from the bottom bracket (see our bottom bracket service guide to rule that out)
- Just installed a new fork, stem, or spacer stack and need to seat the bearings
- Want to do an annual bearing service before something fails
If your bike has a threaded headset(older quill-stem-style), the locknut adjustment is different and not covered here. Almost every bike made after about 2000 uses a threadless headset, which is what we're working with.
Tools & Parts
A headset adjustment uses tools you already own; the only consumable is a small dab of grease for a full service. Total cost for everything is $5-$30if you're starting from scratch.
| Item | Purpose | Notes |
|---|---|---|
| 4, 5, 6 mm Allen wrenches | Top cap and stem bolts | 5 mm covers most modern bikes |
| Torque wrench (2-20 Nm) | Final stem clamp torque | Critical for carbon steerers |
| Clean rags | Wipe bearings and races | Lint-free shop towels work best |
| Bearing pick / small driver | Lift cartridge bearings out | Only needed for full service |
| Bicycle bearing grease | Repack bearings and races | Marine grease is fine; avoid lithium |
| Degreaser | Clean old grease and grit | Citrus-based is plastic-safe |
Step 1: Check for Headset Looseness
Stand next to the bike and squeeze the front brake lever firmly. Place one hand on the headset where the fork enters the frame, then rock the bike forward and backward by the saddle. Any clunk, knock, or felt movement under your fingers means the headset is loose. A subtle knock only on rough pavement counts - play gets worse fast once it starts.
For a second test, lift the front wheel a few inches off the ground and let the handlebars fall to one side. They should swing freely from left lock to right lock without binding. If they stick at a particular angle, the headset is over-tightened. If they swing past center and rebound, you've got play.
Step 2: Loosen the Stem Pinch Bolts
Locate the two (sometimes four) bolts that clamp the stem onto the steerer tube. These are usually on the side of the stem behind the bars. Using the appropriate Allen wrench - usually 4 mm or 5 mm - loosen each bolt one to two full turns. You want the stem free to rotate on the steerer but still resting in place.
Do not remove the bolts. The stem only needs to release its grip on the steerer so the top cap can pull the fork up into the bearings. If the stem is so loose it falls off the steerer, re-thread the bolts a turn or two.
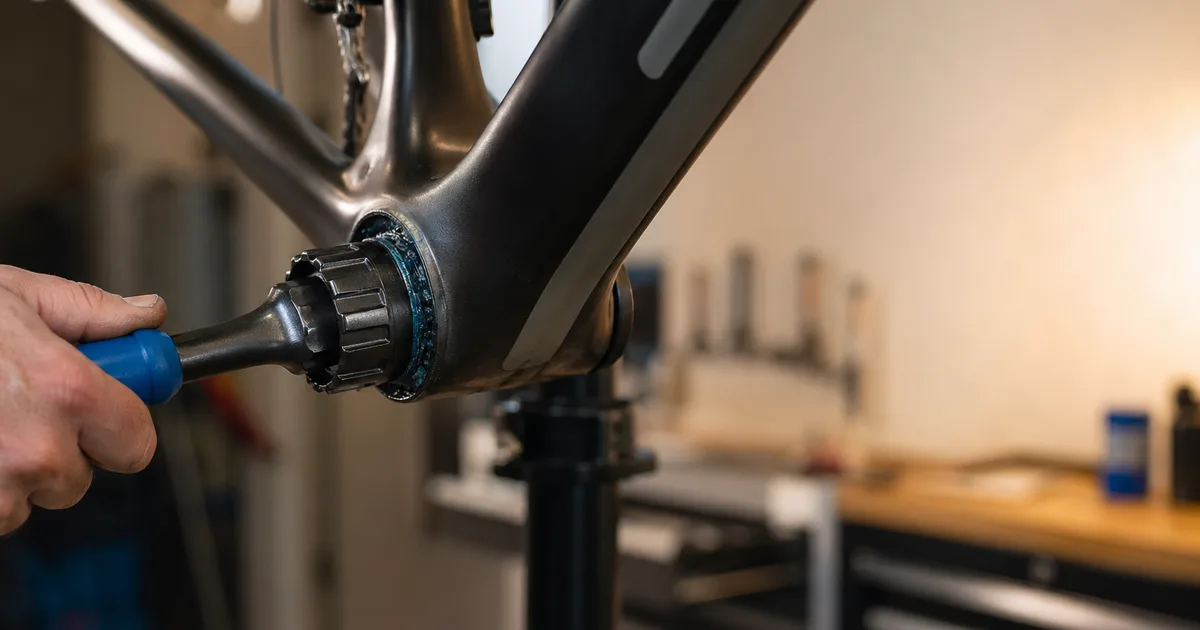
Step 3: Adjust the Top Cap Preload
With the stem loose, switch to the top cap bolt - the single bolt sitting on top of the stem in a recessed cap. This bolt threads into a star nut (alloy steerer) or expander plug (carbon steerer) inside the steerer tube. Tightening it pulls the fork up, which compresses the bearings into their races.
Tighten the top cap bolt slowly, a quarter turn at a time, while rocking the bike with the brake locked. The instant the play disappears, add another 1/8 turnand stop. That's proper preload. Top cap torque is low - typically just 2-5 Nm. Over-tightening here is the most common mistake; the top cap's only job is to hold preload, not to clamp anything.
Carbon steerer note: If your fork has a carbon steerer, an expander plug replaces the star nut. Make sure the expander wedge is still tight in the steerer before you torque the top cap; if the expander spins, the top cap will never hold preload.
Step 4: Center the Handlebars
With the bearings now correctly preloaded, the stem is still free to rotate on the steerer. Stand in front of the bike, sight down the stem from above, and align the handlebars so they sit perpendicular to the front wheel. Squeeze the front wheel between your knees as a reference if needed. Take your time - even a 2-degree offset is immediately obvious on the road.
Step 5: Torque the Stem Bolts
Set your torque wrench to the value stamped on the stem face plate - typically 5 Nm for alloy stems and 5-6 Nm for carbon-clamping stems. Tighten in an alternating star pattern (top, bottom, top, bottom) rather than one bolt at a time. This evens out clamping pressure and prevents twisting the stem on the steerer.
After torquing, look at the gap between the stem and the steerer. The gap should be even on both sides. An uneven gap means the bolts aren't pulling the stem squarely - loosen, recenter, and re-torque.
Step 6: Test the Adjustment
Repeat the rock-and-swing test from Step 1. With the front brake locked, rock the bike: there should be no clunk and no felt play at the headset. Lift the front wheel and let the bars drop side to side - they should swing freely with their own weight, slowing only from cable tension and bearing drag, never sticking.
If you still have play, return to Step 2 and add a hair more preload. If the bars are notchy or won't swing freely, you've over-preloaded - back the top cap off 1/8 turn and re-torque the stem.
Step 7: Service the Bearings (If Needed)
If you've adjusted preload correctly and still hear a creak or feel grinding through the bars, the bearings need cleaning and fresh grease. This is the "full service" path and adds about 20 minutes to the job.
- Remove the top cap, then loosen and remove the stem completely. Lift the stem off the steerer and rest it on the top tube.
- Carefully lower the fork out of the head tube, catching any spacers and the compression ring. Lay the parts out in order so reassembly is foolproof.
- Wipe the upper and lower bearings clean with a rag. If they're cartridge bearings, lift each one out with a bearing pick. Wipe the bearing seats inside the head tube with degreaser.
- Inspect bearings for pitting, rust, or rough spin. If they don't spin smoothly with light finger pressure, replace them - cartridge bearings are cheap and usually printed with a size code on the side (e.g., MR15267-2RS).
- Pack the bearings and races with a thin layer of fresh grease. Add a small bead of grease to the underside of the compression ring and the crown race.
- Reassemble in reverse order: fork up through the head tube, lower bearing, head tube, upper bearing, compression ring, spacers, stem, top cap. Then return to Step 3 to set preload.
Common Mistakes
- Tightening the top cap before loosening the stem. You're trying to compress the bearings; the stem must be loose or the top cap will yank against itself.
- Cranking the top cap to 10 Nm. The top cap is a preload bolt, not a clamp. Over-torquing strips star nuts and crushes carbon expander plugs.
- Skipping the torque wrench on the stem. An under-torqued stem will slip; an over-torqued one can crush a carbon steerer. Use a torque wrench every time.
- Using lithium grease. Lithium grease can attack some elastomer seals over time. Use marine or bicycle-specific grease.
- Forgetting the compression ring.The little wedge ring above the upper bearing is essential - without it the fork won't preload at all.
- No spacer above the stem.Threadless systems need at least 3-5 mm of steerer or spacer above the stem clamp so the top cap can pull. A flush stem won't preload.
Troubleshooting
| Symptom | Likely Cause | Fix |
|---|---|---|
| Clunk on braking | Loose preload | Run Steps 2-5 |
| Notchy or stiff steering | Over-preloaded or worn bearings | Back off 1/8 turn; service if persists |
| Creak under pedaling | Dry bearings or bearing seats | Full service (Step 7), grease all contact points |
| Stem twists when bumped | Stem bolts under-torqued | Re-torque to spec on the face plate |
| Top cap spins forever, no preload | Star nut or expander slipping | Reset star nut or re-tighten expander wedge |
| Bars sit lower than before | Spacer order changed during service | Reorder spacers; cross-check with our reach & stack tool |
When to Visit a Shop
Most headset issues are DIY-friendly, but a few situations are worth handing off to a mechanic with a press and the right pullers:
- Pitted or rusted races pressed into the frame. Removing and pressing in new cups requires a frame-specific tool set; a slipped press can damage a head tube.
- Crown race stuck on the fork.A crown race puller is a single-use tool most home wrenchers don't own.
- Carbon steerer with a cracked or crushed expander. Inspect carefully - a damaged carbon steerer is a safety issue, not a tuning issue.
- Integrated cockpit with internal cable routing. Modern aero bars route brake hoses through the steerer; servicing requires bleeding brakes and reconnecting hydraulic lines.
- Persistent creak you can't isolate. A shop can swap parts methodically - sometimes the culprit is the stem, spacers, or even the seatpost rather than the headset itself.
If your bike runs an integrated headset and you're unsure which bearings it uses, manufacturer size charts on our size charts hub often list the SHIS (Standardized Headset Identification System) code you'll need when ordering replacements.
Frequently Asked Questions
Conclusion
A correctly adjusted headset disappears from your awareness - the bars steer with the wheel, brake forces don't clunk, and creaks belong to other bikes. The whole adjustment takes ten minutes with a single Allen wrench, and a full service adds another twenty if you already have grease in the toolbox. Run the rock test once a month, do a full service every year or two depending on conditions, and your headset will outlast multiple chains, cassettes, and tires without complaint.
Key Takeaways
- Loose stem first, then preload top cap until play disappears plus 1/8 turn, then re-torque stem to 5-6 Nm.
- The top cap is a preload bolt, not a clamp - never crank it past 5 Nm.
- Creaks usually mean dry bearing seats, not loose bearings - full grease service fixes them.
- Use a torque wrench every time you touch a stem bolt, especially on carbon.
- Run the rock-and-swing test monthly; service bearings every 1-3 years depending on conditions.
Related Calculators & Tools
Confirm cockpit fit before re-torquing the stem and topping off preload
Verify frame size and overall fit before component tuning
Match wheel and tire diameter to frame geometry for predictable steering
Pair a quiet headset with a properly set saddle for a balanced fit
Continue Reading
Pair a quiet headset with a quiet, well-lubed drivetrain

Choose the right stem length and angle before re-torquing
The other set of bearings worth servicing on the same workbench day
Pressure that complements a clean cockpit and well-tuned headset