How to Adjust a Rear Derailleur: Indexing & Limit Screws Made Simple
How-To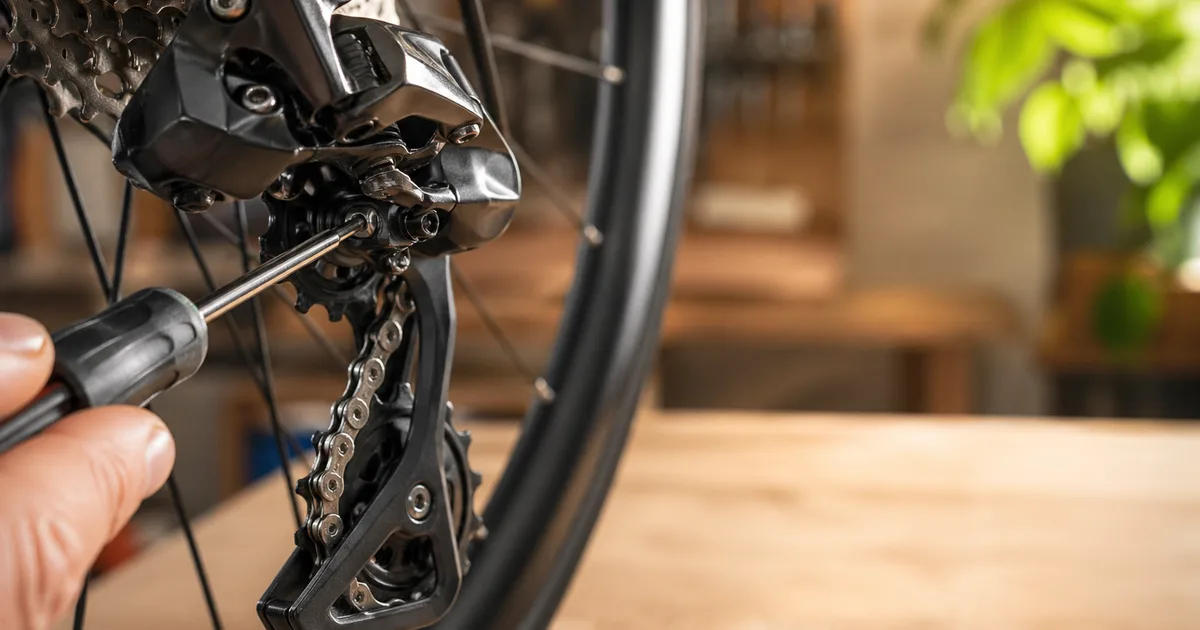
A bike that shifts crisply feels like a different machine - every pedal stroke goes into forward motion instead of arguing with itself. The good news: dialing in a rear derailleur is mostly a matter of doing five small adjustments in the right order. Get the order wrong and you'll chase your tail for an hour. Get it right and the whole job takes about thirty minutes the first time and ten minutes after that. This guide walks through H-limit, cable tension, L-limit, indexing, and B-tension - plus the front derailleur shortcut and a troubleshooting table for ghost shifting, slow shifts, and won't-reach-the-top-cog problems.
At a Glance
- Time: ~30 minutes (10 once practised)
- Skill level: Intermediate
- Cost: $0 if cable is good; ~$20 for a fresh cable + housing
- Tools: Hex set, cable cutter, optional repair stand
Quick Answer
Always go in this order: H-limit → cable tension → L-limit → index in high gear → B-tension → test under load. If you tighten the cable before the H-limit is right, you'll chase the wrong problem all afternoon.
Confused about which gears the screws control? Pair this with our Gear Ratio Calculator → to map your specific cassette and chainring before you start.
Who This Is For
- Riders with hesitating, ghost, or slow shifting who want to fix it at home instead of paying a $40 shop tune
- Anyone who just installed a new chain or cassette and needs to re-index the rear derailleur to match
- Used-bike buyers and weekend mechanicswho want a calm, repeatable workflow that doesn't involve guessing
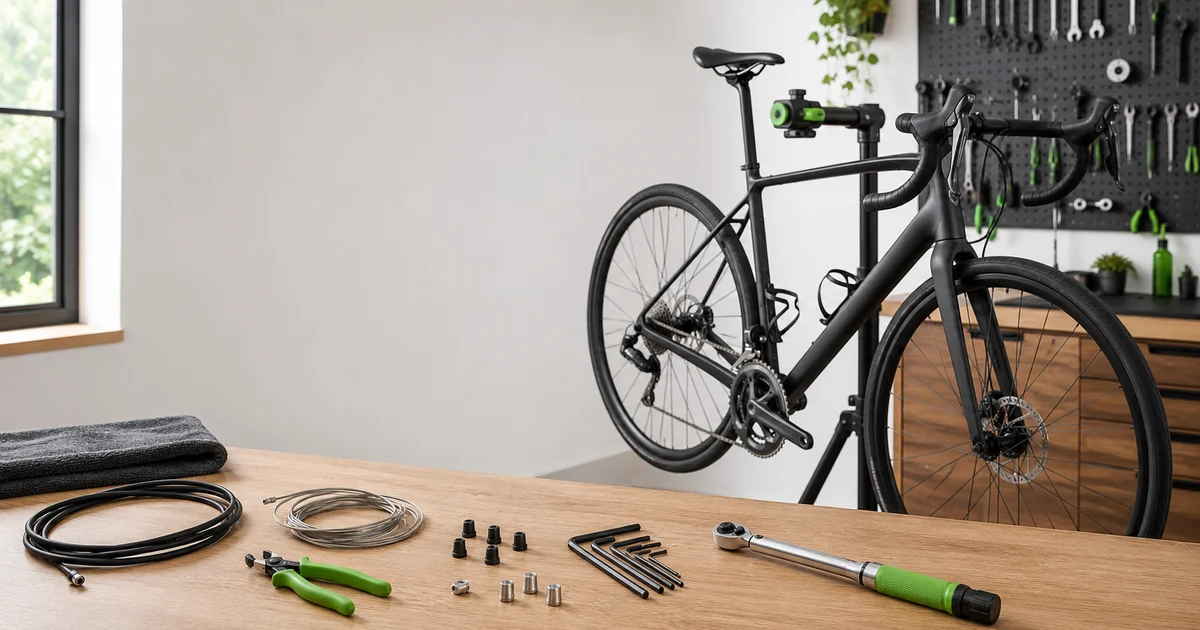
Tools & Parts
Most of these you'll already own if you've done any home wrenching. The cable cutter is the one item to buy nice - pliers crush the housing instead of cutting it, and crushed housing is the single biggest reason indexing won't hold.
| Item | Why | Pick |
|---|---|---|
| Cable & housing cutter | Clean square cuts; no fraying | Park Tool CN-10 |
| Hex key set (2-5 mm) | Pinch bolt and most limit screws | Wera 950 SPKL or Park AWS-10 |
| Shift cable + housing | Stiff, low-stretch housing is what makes indexing hold | Shimano OT-SP41 or Jagwire Pro |
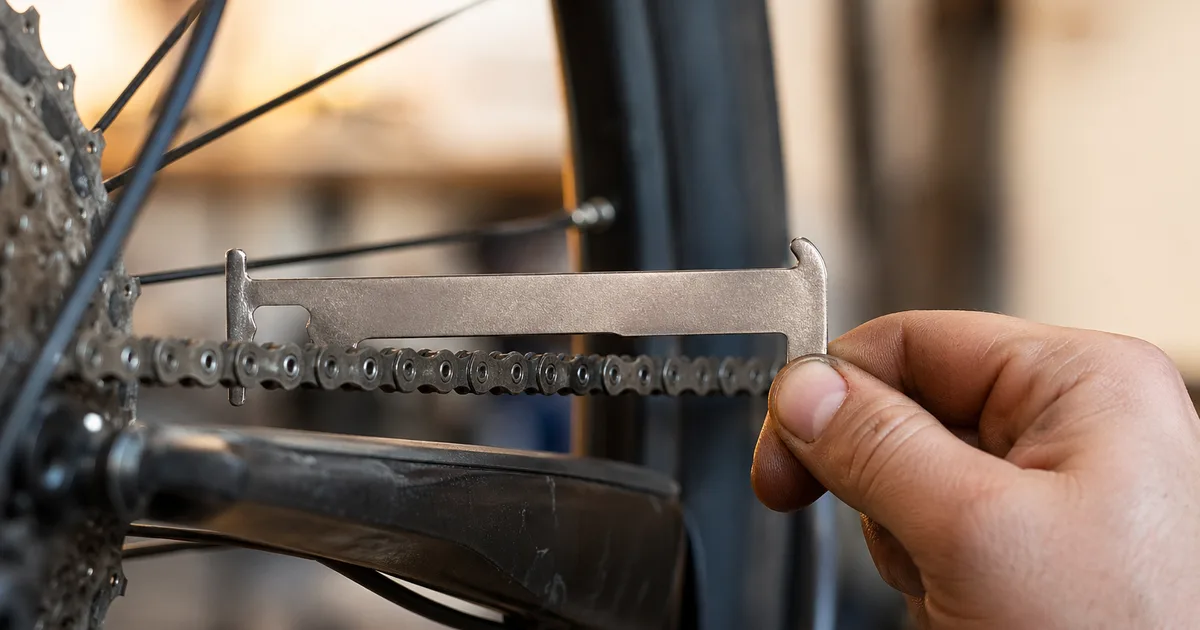
| Chain checker | Rule out a worn chain before chasing indexing | Park CC-3.2 |
| Repair stand (optional) | Lets you spin the cranks and shift hands-free | Any folding stand; even a wall hook works |
When to Re-Index
Re-index any time…
- Shifting hesitates, skips, or auto-shifts (“ghost shifts”)
- You installed a new chain, cassette, or shift cable
- You replaced or moved the rear derailleur, or set up a new bike
- The bike sat unridden for 6+ months - cables stiffen
- You changed cassette range (e.g. 11-32 → 11-36) - B-tension and limits both shift
Before you touch anything, eliminate the two things that mimic bad indexing: a worn chain and a gritty cable. Drop a chain checker on the chain (see our chain replacement guide) and run a quick clean-and-lube (cleaning routine here). If the chain is past 0.5% on 11/12-speed, no derailleur tune in the world will save it - replace it first.
Derailleur Anatomy in 90 Seconds
Five adjustment points control everything the rear mech does. Learn these and the order makes sense.
- H-limit screw (marked “H”). Sets how far outward the cage can travel. Controls the smallest (highest-gear) cog. Set first.
- L-limit screw (marked “L”). Sets how far inward the cage can travel. Controls the largest (lowest-gear) cog. Set after the cable is tensioned.
- B-tension screw. Sets the gap between the upper jockey wheel and the cassette. Too close = grindy, slow shifts. Too far = hesitant, vague shifts.
- Cable pinch bolt. The 4 or 5 mm bolt that clamps the inner shift cable to the derailleur body. Always tighten with the cable taut and the barrel adjuster wound in.
- Barrel adjuster. The knurled cylinder where the housing meets the derailleur (and often the shifter too). Quarter- turn adjustments fine-tune cable tension without re-pinching.
On Shimano and SRAM mechanical derailleurs the H/L screws are labelled. Electronic systems (Di2, AXS) skip the cable entirely - you'll still set H/L limits and B-tension but indexing happens in software. More on that in the FAQ.
How to Adjust a Rear Derailleur in 6 Steps
Hang the bike in a stand if you have one. Shift the front to the middle ring (or only ring on a 1x setup) and the rear to the smallest cog before you start. Quick check: spin the cranks backwards. If the chain runs noisy or skips, your problem may not be indexing - see the troubleshooting table first.
Step 1 - Set the H-Limit (Highest Gear)
Shift all the way to the smallest cog. If your cable is already tensioned, loosen the pinch bolt so the cable goes slack - the H-limit must be set without cable interference. Look down from above. The two jockey wheels should sit in a straight vertical line directly under the centre of the smallest cog. Turn the H-limit screw clockwise to move the cage inward (toward the wheel), counter-clockwise to move it outward. When it's centred, give the H screw a final eighth-turn clockwise so the cage sits one hair inside the cog - that prevents the chain from being thrown into the dropout.
Step 2 - Tension the Cable and Pinch It
Wind the rear derailleur barrel adjuster all the way clockwise (in), then back it out two full turns. Wind any in-line or shifter barrel adjusters in the same way. Make sure the shifter is clicked all the way to high gear (smallest cog position). Pull the inner cable taut with your fingers - firm, but don't lean on it - and tighten the pinch bolt to roughly 5 Nm. The cable should be snug with no visible slack, but not stretched. Trim the tail to about 2 cm and crimp on a cable end cap.
Step 3 - Set the L-Limit (Lowest Gear)
With your hand, push the derailleur body inward by hand toward the largest cog (don't use the shifter - you want to feel the limit). The cage should travel until the upper jockey wheel sits directly under the largest cog. If it goes too far inward (the chain wants to fall into the spokes) turn the L-limit screw clockwise. If it can't reach the largest cog, turn the L screw counter-clockwise. Done correctly, you can shove the cage hard and it stops one hair short of the spokes.
Step 4 - Index the Cable from the Highest Gear
Shift to the smallest cog. Click up one cog. The chain should jump cleanly to the next cog, no hesitation, no grinding. If the chain hesitates and won't reach the next cog, turn the barrel adjuster counter-clockwise a quarter turn (this adds cable tension, which pulls the derailleur further inward). If the chain rattles or wants to overshoot, turn the barrel adjuster clockwisea quarter turn. Climb the cassette one cog at a time, fine-tuning. By the time you're at the largest cog, every shift should land cleanly. Then shift back down through every gear - same expectation.
Step 5 - Set the B-Tension
Shift to the largest rear cog. Look at the gap between the top of the upper jockey wheel and the bottom of the cassette tooth above it. Shimano road and MTB: roughly 5-6 mm. SRAM Eagle and AXS Eagle: noticeably more, typically 13-14 mm (use the supplied B-gauge if you have it). Turn the B-tension screw clockwise to increase the gap, counter-clockwise to decrease. Too tight = grinding, slow shifts to the big cog. Too loose = vague, sloppy shifts. Re-check by shifting to the smallest cog - the gap should still look reasonable.
Step 6 - Test Under Load
A repair-stand-quiet bike often shifts differently under real load. Take the bike off the stand and either ride a flat block or pedal-and-brake on the spot. Shift up and down through every cog, twice. A final quarter-turn of the barrel adjuster either way is normal - that's why barrel adjusters exist. If shifts under load still feel mushy, your housing is probably compressing (replace it) or the chain's worn (measure with our calculator).
Front Derailleur Quick Tune
The front derailleur uses the same logic with two differences: the cage angle has to be aligned over the big chainring first, and there is no B-tension screw - instead you set the height of the cage above the big ring (1-3 mm gap, parallel to the teeth).
- Cage height: 1-3 mm above the tallest tooth of the big chainring.
- Cage angle: outer plate parallel to the big chainring (look from above).
- L-limit: chain on small ring + largest rear cog, set L screw so the inner cage almost touches the chain.
- Cable tension: shifter clicked to small ring, pull cable taut, pinch.
- H-limit: chain on big ring + smallest rear cog, set H screw so the outer cage almost touches the chain.
- Trim: use the trim click on road shifters to eliminate cage rub at extreme cross-chain angles.
Fronts are fussier than rears because of the chainline geometry. If yours fights you, double-check chain length first (chain length calculator) - a too-long chain has slack the front cage can't take up.
Common Mistakes
- Tightening the cable before the H-limit is set.Every other adjustment depends on the cage being centred under the smallest cog with zero cable tension. Skip this and you're tuning around an offset.
- Cranking the B-tension to fix indexing. B-tension changes shift feel, not which cog the cage lands on. If the chain misses the next cog, fix cable tension (the barrel adjuster), not B-tension.
- Reusing a frayed cable end. The end you cut off to free the cable is fluffed at the strands. Trim a fresh square end with a real cable cutter (Park CN-10, Jagwire) before re-pinching, or it slips under load and the indexing drifts.
- Forgetting to wind the barrel back out two turns. You need range to fine-tune in both directions. If the barrel is all the way in, you can only loosen tension; all the way out, only tighten.
- Tuning to a worn chain or cassette. A new chain on worn cogs skips no matter what you do. Measure the chain (our guide) and inspect the cogs before blaming the mech.
- Skipping the load test. A bike-stand-tuned drivetrain can shift perfectly with no torque on it and still ghost-shift under climbing load. Always finish with a real ride.
Troubleshooting
| Symptom | Likely Cause | Fix |
|---|---|---|
| Ghost shifting (auto-shifts under load) | Bent hanger, worn chain, cable tension too low | Check hanger alignment first; measure chain; quarter-turn barrel CCW |
| Won't shift to the largest cog | L-limit too tight, cable tension too low | Back L screw out a half turn; if no help, add cable tension (CCW barrel) |
| Won't shift to the smallest cog | H-limit too tight, cable tension too high, sticky cable | Loosen pinch bolt → reset H → re-tension; replace cable if gritty |
| Chain falls inboard into the spokes | L-limit too loose | Tighten L screw a quarter turn; re-confirm largest-cog position |
| Chain falls off small cog (outboard) | H-limit too loose | Tighten H screw a quarter turn |
| Slow, hesitant shifts to bigger cogs | Cable tension low, dirty cable, B-tension too tight | Quarter-turn barrel CCW; lube or replace cable; back B screw out a half turn |
| Vague, mushy shifts to smaller cogs | Cable tension high, B-tension too loose | Quarter-turn barrel CW; check B-gap (~6 mm Shimano) |
| Indexing drifts after a few rides | Cable stretching in (new install) or housing compressing | Quarter-turn barrel CCW; if it persists, replace housing with SP41 |
Notice how often the answer is “quarter turn of the barrel adjuster.” That's the design intent - the barrel exists precisely so you can fix 80% of indexing complaints in five seconds, no tools required.
When to Call a Shop
Two situations are worth handing off:
- Bent derailleur hanger.If shifts are always worse on certain cogs and the cage looks visibly cocked when viewed from behind, the hanger is bent. A shop has a Park DAG-2.2 (or similar) gauge that aligns the hanger to the wheel plane. Without it you're guessing - and bending hangers cold can snap them.
- Electronic shifting (Di2, AXS) that won't pair or micro-adjust. Diagnostic mode and firmware updates are shop work. Mechanical limit screws and B-tension you can still handle yourself - the rest needs the OEM tool.
Bent hangers are surprisingly common - even a gentle drive-side tip-over on a parked bike can do it. If a tune that should have worked didn't, the hanger is the first thing a shop will check.
Tools and Parts We Recommend
These are the cable cutters, hex sets, and replacement cables we keep buying. None are required to start, but every one of them makes the job faster and the result more durable.
Cable, Cutters, and Cassette-Adjacent Tools
Our top picks for the indexing job and the supporting drivetrain checks.
Park Tool
Park Tool CN-10 Cable & Housing Cutter
The shop-standard cable and housing cutter. Clean cuts on shift housing every time - frayed or crushed ends are the #1 cause of bad indexing.
Wera
Wera 950 SPKL Hex-Plus L-Key Set
Hex-Plus tip geometry grips worn screws without rounding them. The 2/2.5/3/4/5 mm sizes cover every derailleur screw and pinch bolt on the bike.
Park Tool
Park Tool AWS-10 Hex Wrench Set
Workshop-grade folding hex set with the 5 mm and 4 mm keys you’ll use most for cable pinch bolts and limit screws.
Shimano
Shimano OT-SP41 Shift Cable & Housing Set
OEM-grade stainless inner cable and SP41 housing. Compresses far less than generic housing, which is what indexed shifting actually needs.
Jagwire
Jagwire Pro Shift Cable & Housing Kit
Slick-coated inner wires plus pre-cut housing in multiple colours. A complete kit for re-cabling road or MTB drivetrains.
Park Tool
Park Tool CC-3.2 Chain Checker
Five seconds with this gauge tells you whether ghost shifting is a chain problem (worn) or a derailleur problem (out of index).
As an Amazon Associate we earn from qualifying purchases. This helps support our free calculators.
Frequently Asked Questions
Conclusion
Indexing a derailleur is an order-of-operations job, not a feel-it-out job. Set the H-limit with a slack cable, tension the cable, set the L-limit, index from the high gear with the barrel adjuster, set B-tension last, then test under real load. Do that and a $20 cable kit plus a hex set will keep your drivetrain crisp for a couple of years between cable changes. Pair this with our chain replacement guide and the cassette removal guide and you can refresh an entire drivetrain from your garage.
Key Takeaways
- Order matters: H-limit → cable → L-limit → index → B-tension → ride test.
- Quarter-turn discipline: the barrel adjuster fixes 80% of complaints without re-pinching the cable.
- Rule out chain wear and crushed housing before blaming the derailleur - both mimic indexing problems.
- Bent hanger = shop visit. Cold-bending hangers snaps them; a Park DAG-2.2 alignment is the right move.
- New drivetrain combo? Sanity-check it with our Gear Ratio Calculator before you re-index.
Related Calculators & Tools
Confirm your cassette and chainring combo before you re-index a swapped drivetrain
Verify chain length - too short or too long will fight any derailleur tune
A worn chain skips no matter how well the derailleur is indexed - measure first
Inherited a used bike with sloppy shifting? Confirm fit while you tune the drivetrain
Continue Reading

Catch a sloppy derailleur before it costs you a ride
If indexing will not hold, a stretched or corroded shift cable is usually the culprit - swap it, then re-index

If indexing problems trace back to a worn-out groupset, plan the next bike right
A worn chain causes ghost shifts that no derailleur tune will fix - measure first