Wheel Truing Basics: Fix a Wobbly Wheel at Home
How-To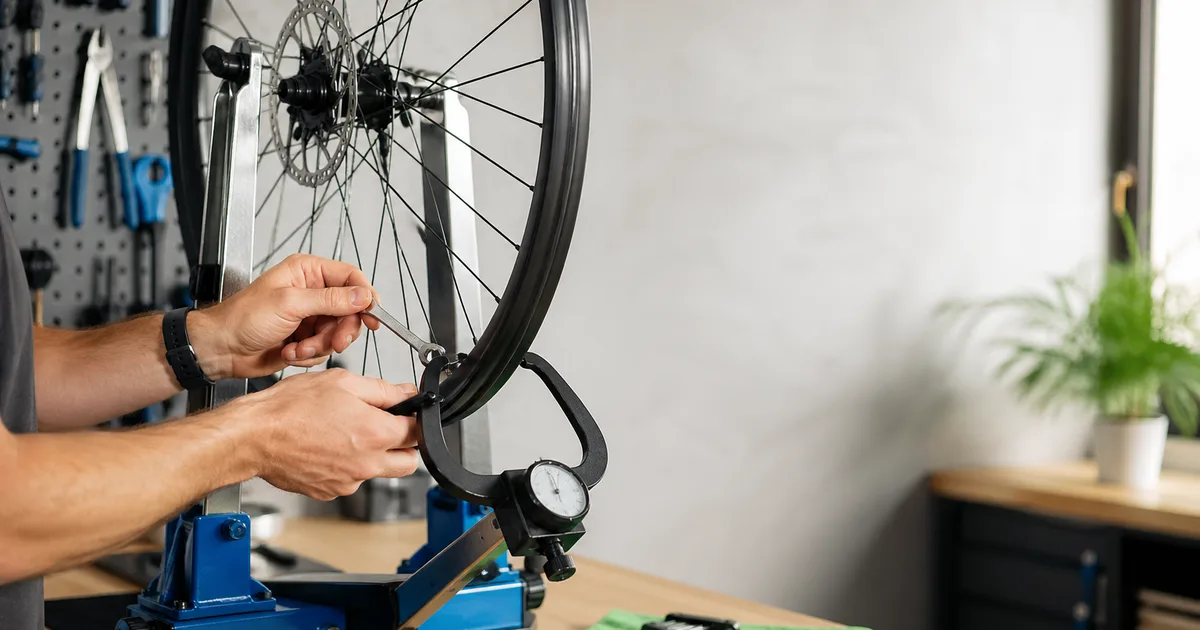
A bike wheel goes out of true the same way a guitar slips out of tune - gradually, then all at once. A pothole, a kerb hop, a heavy commute on rough tarmac, and suddenly the rim is rubbing the brake pad on every revolution. The good news: most wheels can be brought back inside a millimetre of true with a single tool, a steady hand, and about 45 minutes. This guide walks through how to true a bike wheel at home, the right spoke wrench sizes (3.23, 3.30, and 3.45 mm), how to read lateral wobble versus radial hop versus dish, and how to swap a broken spoke without trashing the wheel.
At a Glance
- Time: 30-60 minutes for a typical wheel
- Skill level: Intermediate
- Cost: ~$15-$40 in tools (one-off)
- Tools: Spoke wrench, gauge (brake pad or stand)
Quick Answer
To true a bike wheel: spin it past a fixed gauge (brake pad or truing-stand pointer), find where the rim pulls left or right, and tighten the spoke on the opposite side (or loosen the spoke on the same side) by a quarter turn. Re-check, repeat in smaller increments, then verify dish and tension.
Replacing a spoke instead of tweaking one? Use our Spoke Length Calculator → to order the exact length for your hub and rim combo.
Who This Is For
- Commuters and weekend riderswith a wheel that's rubbing the brake pad after a kerb hop or pothole hit
- Mechanic-curious cyclists who already own a multitool and want to add one more skill before paying a shop $30 a wheel
- Tourers and bikepackers who need to know how to swap a broken spoke on the road without a truing stand
Lateral vs Radial vs Dish - What You're Actually Fixing
A trued wheel has three things going for it. Get any one wrong and the wheel either rubs, hops, or pulls in a straight line.
- Lateral true (side-to-side). The rim tracks in a flat plane. No wobble left or right as you spin it. This is the fix 90% of riders are looking for.
- Radial true (up-and-down). The rim is round - the gap between the rim and a fixed gauge is the same all the way around. A radial hop feels like a thump in the brake or saddle once per revolution.
- Dish. The rim sits centred between the dropouts. On a rear wheel the spoke angles are different on the drive and non-drive sides (to make room for the cassette), but the rim itself must be centred. An off-dish wheel makes the bike track crooked even when both wheels are perfectly round.
Diagram placeholder
Three-panel illustration: (1) wheel viewed end-on showing lateral wobble, (2) wheel viewed from the side showing radial hop, (3) wheel between dropouts showing dish offset.
You fix them in that order: lateral first, radial second, dish last. Doing them out of order means re-doing them, because each adjustment slightly affects the others.
Find the Wobble
You don't need a $400 truing stand to true a wheel. You need a fixed reference point that doesn't move while the rim does.
- If you have a stand: mount the wheel and back the gauge fingers off until they just clear the rim. Spin slowly. Tighten the gauge in until it kisses the rim at the high point.
- If you have rim brakes: flip the bike upside-down (or hang it). The brake pads themselves are your gauge. Squeeze the lever a hair so the pads narrow toward the rim.
- If you have disc brakes: zip-tie a screwdriver or chopstick to the chainstay or seatstay so the tip just clears the rim. Free, repeatable, perfectly accurate for home use.
Spin the wheel slowly. Where the rim pulls toward the gauge, you've found the wobble. Mark it with chalk on the tire wall - both the location and the direction it pulls. A typical wobble is 1-4 mm; past about 5 mm you're in “tacoed wheel” territory and a rebuild may be cheaper than truing. (For ISO/ETRTO sizing of any replacement rim, our Wheel Size Calculator does the math.)
Tools & Parts
| Item | Why | Pick |
|---|---|---|
| Spoke wrench (3-size) | Fits 3.23, 3.30, and 3.45 mm nipples without rounding flats | Park Tool SW-7.2 |
| Truing stand (optional) | Faster, more accurate; worth it if you build wheels | Park Tool TS-2.3 |
| Tension meter (optional) | Equalise tension after truing or rebuilding | Park Tool TM-1 |
| Replacement spokes | For broken-spoke fixes - straight-gauge or butted | DT Swiss Champion / Sapim Race |
| Spoke prep | Holds tension without locking nipples permanently | DT Swiss Spoke Freeze |
| Light oil | A drop on each nipple seat reduces friction and squeak | Tri-Flow / Phil Tenacious |
Affiliate links to each of these are in the recommended-products grid further down.
How to True a Bike Wheel - Step by Step
First time through, give yourself an hour. Once you've done it twice, a typical wheel takes 20 minutes. Quarter-turns only at first; eighth-turns once you're close.
Step 1 - Identify Wobble Direction
Spin the wheel and watch the gauge. Note which side the rim pulls toward and how wide the wobble is. Mark the centre of the affected zone with chalk on the tire wall, plus an arrow showing direction. Big wobbles often span 3-6 spokes; small ones live on a single spoke.
Step 2 - Confirm Spoke Wrench Size
Measure the flats on a nipple with digital calipers. Common sizes:
- 3.23 mm - Mavic, DT Swiss alloy, many older Shimanowheels (Park black)
- 3.30 mm - most modern OEM wheels with brass nipples (Park green)
- 3.45 mm - heavier-duty MTB and touring wheels (Park red)
The wrong size will round the nipple flats and turn a 30-minute job into a wheel rebuild. If you're unsure, the Park SW-7 or SW-7.2 triple wrench covers all three.
Step 3 - Adjust by a Quarter Turn
At the centre of the wobble, find the spoke that runs to the opposite side of the hub flange. Tighten that spoke a quarter turn. Or loosen the spoke on the same side as the wobble by a quarter turn. Either pulls the rim away from the wobble. Most truing gives the best feel by combining both: tighten one, loosen the adjacent same-side spoke half as much.
Step 4 - Re-check, Repeat in Smaller Increments
Spin and gauge again. The wobble should be smaller. Repeat with quarter-turns until the gap drops below ~2 mm, then drop to eighth-turns for the final pass. Spread adjustments across two or three adjacent spokes rather than hammering a single one - single-spoke fixes leave a flat spot in the rim.
Step 5 - Check Radial True (Up/Down Hop)
Move the gauge to the underside of the rim. Spin slowly. A round wheel sits an even gap from the gauge through a full rotation. To pull a high spot down, tighten both the left and right spokes at that location together, by an eighth-turn each. Tightening only one side will pull the rim sideways instead of down.
Step 6 - Check Dish
With the wheel still in the bike, eyeball the gap from the rim to each chainstay (or each fork blade). They should be equal. For a precise check, flip the wheel in the dropouts and look again - a well-dished wheel looks identical either way. To shift the rim toward one side, tighten everyspoke on that side by an eighth-turn. It's tedious but it's the only way that doesn't blow out the lateral true you just dialed in.
Step 7 - Stress Relieve and Final Tension Check
Grab pairs of parallel spokes (the two that run roughly the same direction, on the same side) and squeeze them firmly. Work all the way around. You'll hear pings as the spokes release wind-up accumulated during truing. Re-check lateral and dish - both will move 0.5-1 mm and need a final touch-up. If you have a tension meter like the Park TM-1, verify spoke tensions are within ~20% of each other on the same side. No meter? Pluck adjacent spokes and listen - they should ring at similar pitches.
Broken Spoke Field Fix
A broken spoke usually announces itself with a ping followed by an immediate, awful wobble. Resist the urge to white-knuckle home on a buckling rim - open the brake (rim) or pull the wheel and hand-walk it to safety, then plan a proper fix. Three options, roughly in order of permanence:
- Roadside Fiberfix or Hozan emergency spoke. A Kevlar or steel cable with hooks on both ends that bridges the broken spoke without removing the cassette or tire. Tension by hand, ride home, replace properly. A $15 part that lives in your tool roll.
- Replacement spoke (thread method). Order the right length using our Spoke Length Calculator (you'll need ERD, hub flange diameters, and your lacing pattern). For drive-side rear spokes, you'll have to remove the cassette first - see our cassette removal guide. Pull the tire and rim tape, drop a new nipple through the rim, thread the new spoke through the hub flange following the existing lacing pattern (it crosses over and under the same way as its neighbours), and tension it to match the spokes on either side. Then true the wheel as above.
- Bend a generic spoke to fit.Last resort. If you can't get the right length, a slightly long J-bend spoke can be shortened with a spoke cutter and re-threaded, or bent at the hub-flange exit to compensate for length. This is shop-only work - do not improvise on a carbon rim or a wheel you ride at speed.
After any spoke replacement, retension and re-true the entire wheel. A single new spoke at full tension while its neighbours sit slack will pull the rim out of round within one ride.
Common Mistakes
- Over-tensioning.Tighter is not better. Past the rim's spec (typically 100-130 kgf for alloy road, 110-135 for MTB), nipples crack, eyelets pull through, and carbon rims fail catastrophically. Equal tension matters more than peak tension.
- Ignoring dish. A laterally-true but off-dish wheel makes the bike track crooked. Always finish with a dish check.
- Using the wrong wrench size. A 3.23 mm wrench on a 3.30 mm nipple rounds the flats inside one turn. Measure first.
- Twisting spokes instead of turning nipples.If a spoke isn't lubed at the nipple seat, the spoke twists with the nipple instead of the nipple threading along the spoke. The wheel looks true until you ride it - then the spokes unwind. Always do a stress-relief squeeze (Step 7) to release wind-up.
- Truing one spoke at a time. Spread adjustments across 2-3 adjacent spokes. A single-spoke pull leaves a flat spot and makes the next wobble worse.
- Skipping the lateral-radial-dish order. Each adjustment moves the others. Do lateral first, radial second, dish last. Re-check all three at the end.
Troubleshooting
| Symptom | Likely cause | Fix |
|---|---|---|
| Cracking / pinging sounds while truing | Spoke wind-up releasing, or under-lubed nipple seats | Stress-relieve (Step 7); add a drop of oil at each nipple |
| Wobble keeps coming back after truing | Twisted spokes that unwound on the first ride | Re-true and stress-relieve again; lube nipple seats next time |
| Dish off - rim sits closer to one chainstay | Asymmetric tension between drive and non-drive | Tighten every spoke on the close side ⅛ turn until centred |
| Wheel feels “loose” in the frame | Hub bearing play mistaken for poor true | Wiggle the rim laterally with the wheel mounted; clunk = hub, not rim. Service the hub before truing. |
| Brake pad rubs in the same spot every revolution | Lateral wobble at that location | Standard truing fix; verify the pad isn't bent first |
| Rim hops once per revolution under braking | Radial high spot | Step 5 - pull both same-location spokes down together |
When to Call a Shop
Truing is a great home-mechanic skill for alloy rims and minor wobbles. Hand off to a wheelbuilder when:
- Carbon rims. Carbon hates over-tension and small mistakes show up as catastrophic failures. Pay the $30/wheel.
- Wheel needs a complete rebuild. If more than 2-3 spokes are broken, or the rim has a visible crack or dent, a full rebuild with a new rim is faster and safer than chasing the wobble.
- Rear wheel with a dished hub for cassette + disc rotor. Asymmetric rims (Mavic Sup'R, DT Swiss ASR) require specific tension ratios and a dish gauge. Possible at home if you're patient - much faster at a shop.
- Tubeless wheel that won't hold air after truing. Spoke holes and rim tape disturbed by tightening can leak. Our tubeless setup guide covers re-taping; if it still won't seal, the rim bed may be damaged.
- You're unsure.A wheel collapsing at speed is a hospital visit. There's no shame in paying a professional.
Before you book the appointment, run our pre-ride safety check - sometimes the “wheel” problem is actually a loose headset (headset service guide) or worn brake pads (brake pad replacement).
Recommended Tools & Calculators
These are the tools and replacement spokes we keep recommending. Grab a triple spoke wrench at minimum - everything else is optional until you start building wheels from scratch.
Wheel Truing Tools and Replacement Spokes
Spoke wrenches, stands, tension meters, and spokes we trust on our own wheels.
Park Tool
Park Tool SW-7.2 Triple Spoke Wrench
Three-in-one spoke wrench covering 3.23 mm, 3.30 mm, and 3.45 mm nipples - the most common sizes on alloy and steel rims worldwide.
Park Tool
Park Tool TS-2.3 Professional Truing Stand
The shop-standard stand. Accepts 16"-29" wheels, fat-bike hubs, and through-axles up to 170 mm. Overkill for one wheel a year - perfect if you’re building.
DT Swiss
DT Swiss Spoke Prep / Spoke Freeze
Threadlocker designed for spoke nipples - keeps tension stable without cementing the nipple in place. Use sparingly on the threads before lacing.
DT Swiss
DT Swiss Champion Straight-Gauge Spokes (10-pack)
Bulletproof 2.0 mm straight-gauge spokes - the safe choice for replacements when you don’t know the original spec. Order length using our Spoke Length Calculator.
Sapim
Sapim Race Double-Butted Spokes (10-pack)
2.0/1.8/2.0 mm butted spokes - lighter, more elastic, and a great match for performance road and gravel wheels. Pairs with brass nipples for durability.
Park Tool
Park Tool TM-1 Spoke Tension Meter
Measures relative spoke tension across a wheel so you can equalise it. Not strictly required for truing, but indispensable for builds and post-rebuild checks.
As an Amazon Associate we earn from qualifying purchases. This helps support our free calculators.
Frequently Asked Questions
Conclusion
Truing a bike wheel is one of the best return-on-investment skills you can learn as a home mechanic - a $12 wrench, 45 minutes, and a steady hand replace a $30 shop visit and save you hauling the bike across town. Keep the order straight (lateral, radial, dish), work in small increments, and stress-relieve before declaring it done. For bigger projects - broken spokes, full rebuilds - anchor the parts order with our Spoke Length Calculator and Wheel Size Calculator, and pair this guide with our tubeless setup and tire pressure guides to round out the wheel-side maintenance kit.
Key Takeaways
- Order matters: lateral first, radial second, dish last - then re-check all three.
- Quarter-turns, then eighth-turns. Spread fixes across 2-3 adjacent spokes, not one.
- Measure your nipples - 3.23 / 3.30 / 3.45 mm - before turning anything.
- Stress-relieve at the end to release spoke wind-up, then re-true.
- Carbon rims, full rebuilds, asymmetric hubs → shop work.
Related Calculators & Tools
Get exact spoke lengths for a rebuild or a single replacement spoke
Identify your wheel diameter (ISO/ETRTO) before you order a new spoke
A trued wheel deserves the right pressure - dial it in by rider weight and tire
Confirm overall fit if you inherited the bike with sketchy wheels
Continue Reading

Catch a loose spoke or a buckled wheel before it strands you

Cockpit decisions that pair with a freshly trued front wheel

Reset pressures once your wheel is round again

A flat is the most common reason riders pull a wheel - pair this skill with truing